How to Transfer Web Hosting from One Company to Another
How to migrate a websites from one server to another server?
Static/PHP SITE: MOVING FROM ONE SERVER TO ANOTHER
This is how it works:
- Copy the data from server A to server B (also db dump).

- Check to see if your site is operating properly on server B.
- Redirection from server A to server B (usually in .htaccess file).

- DNS records should be changed to point to server B.

- Wait for DNS updates to be picked up (note: Emil proposed this). TTL settings on DNS entries can be lowered to shorten this time).
- Server A material should be removed (end hosting).
Do you intend to migrate your WordPress Website to a new Hosting Provider or Server to another Web Hosting Provider or Server?
When transferring web hosting or relocating a website to a new server, the most significant risk is data loss and downtime.
Both of these things can make your website inaccessible to users and search engines for a short period of time, resulting in lost sales and search engine rankings.
We’ll teach you how to migrate your WordPress site to a new host safely and without downtime in this step-by-step tutorial.
We’ll also address the most typical questions about migrating a WordPress site to a new hosting provider, so you can prevent common blunders.
Important: Before we begin, you should be aware that many WordPress hosting companies provide a free migration service. It’s possible that it’s not listed on their website, so just inquire. The majority of the time, it is free, however others may demand a modest cost.
Steps to migrate website from one hosting to another without any downtime
Select a New WordPress Host
If you’re still having trouble with a slow web host after boosting WordPress speed and performance, it’s time to switch to a new host that can handle your expanding traffic.
It’s critical to choose wisely while looking for a new WordPress hosting service so you don’t have to relocate again anytime soon.
Do not install WordPress after purchasing your new hosting. That will be done at a later step. For the time being, your new web hosting account should be empty, with no files or folders in the primary directory.
Create a Duplicator for a Simple Migration
The first step is to download and install the free Duplicator plugin on the website you wish to migrate. See our step-by-step guide on installing a WordPress plugin for more information.
We highly recommend Duplicator, a free plugin. It can also be used to transfer your website to a new domain name without losing its SEO.
However, we’ll show you how to utilise it to migrate your WordPress site from one server to another with no downtime in this article.
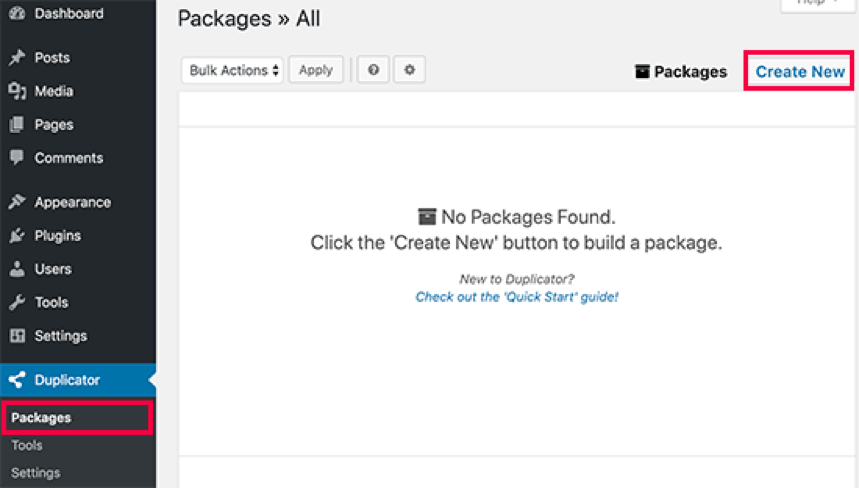
Go to the Duplicator » Packages page in your WordPress admin area after you’ve installed and enabled Duplicator.
After that, go to the top right corner and click the ‘Create New’ button.
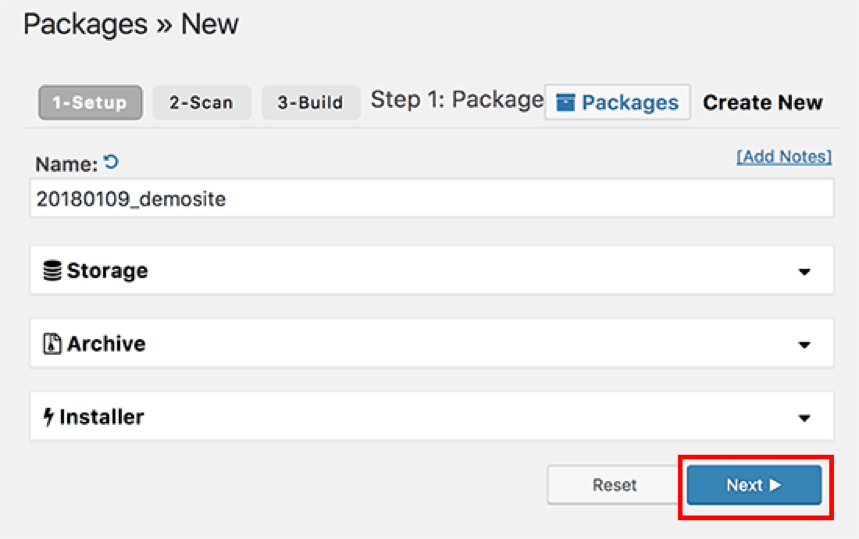
After that, click Next and follow the on-screen instructions to create your package.
After you’ve double-checked that your scan findings are correct (everything should indicate “Good”), click the Build button.
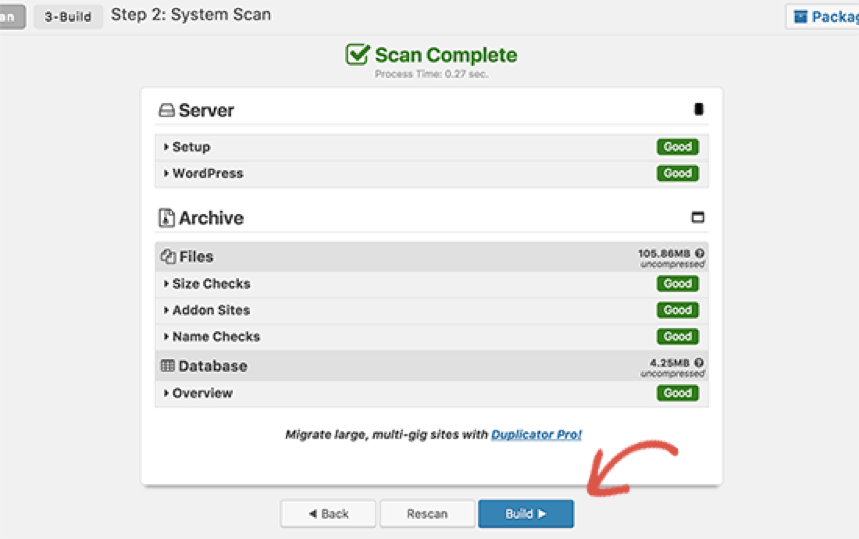
Because the process may take many minutes to finish, keep the tab open while the plugin works.
After the process is finished, you’ll be able to download the Installer and Archive packages. To get both files, click on the ‘One click download’ link.
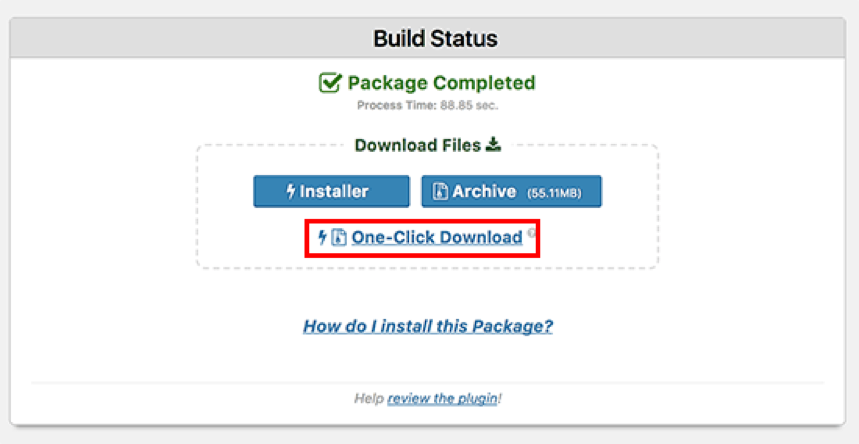
The installer file will automate the installation procedure for you, while the archive file is a copy of your entire website.
Transfer Your WordPress Website to a New Host
After you’ve downloaded the archive and installer files, you’ll need to upload them to your new web hosting account.
You can do this by utilising FTP to connect to your new web host.
Check out our beginner’s tutorial to uploading files to WordPress using FTP if you’ve never done it before.
When connecting your FTP client, you should normally specify your website’s domain name as host.
Because your domain name is still referring to your old host, you’ll need to connect using the IP address or server hostname of your server. This information can be found in the cPanel dashboard of your new hosting account.
If you are unable to locate this information, contact your new web hosting company’s support team, who will gladly assist you.
You must upload both the installer.php file and the archive.zip file to the root directory of your website using an FTP client.
If you’re still unsure, contact your web hosting company.
Ascertain that your root directory is absolutely devoid of any files. When you sign up for a web hosting account, some companies will automatically install WordPress.
If WordPress is installed in your root directory, you must first delete WordPress.
After that, upload the archive zip file as well as the installer.php file to your site’s root directory.
To Avoid Downtime, Change the Hosts File
You’ll need to open the installer.php file in a browser after you’ve uploaded both files to your new host.
Other guides may advise you to update your domain nameservers and point your domain to your new hosting provider, however this is incorrect.
Your visitors will notice a broken website while you migrate it if you do this now.
On Your New Host, Create a MySQL Database
You must first build a MySQL database on your new hosting account before we can run the installation on it. You can skip to the following step if you’ve already built a MySQL database.
Begin the migration of the duplicator.
We’re all set to launch the installer now. Replace example.com with your domain name in your browser window and go to the following site.
Make sure your domain name servers are up to current (DNS)
You’ve copied your WordPress database and files to your new hosting server at this point, but your domain still redirects to your old web hosting account.
You’ll need to change your DNS nameservers to update your domain. When your users type your domain into their browsers, they will be directed to the new location of your website.
It’s best to transfer your domain to a new host if you registered it with your hosting company. You must update your nameservers if you used a domain registrar such as Domain.com, GoDaddy, Network Solutions, or another.
Your new web host’s DNS nameserver information will be required.
Conclusion
Because the material on your old and new hosts is identical, your users will not notice a difference. There will be no downtime as a result of your WordPress migration.
To be on the safe side, we recommend waiting 7 days after your migration to deactivate your old hosting account.
To transfer your web hosting to us, Get started here on this https://freshroastedhosting.com/hosting/
Or you can just drop mail at Fresh Roasted Hosting Support https://freshroastedhosting.com/contact/ and we will take care of the transfer process without any migration charges.
HOW CAN MAGENTO WEBSITE BE TRANSFERRED FROM ONE SERVER TO ANOTHER?
If you’re a Magento developer, you’ll occasionally need to relocate your Magento eCommerce store from one host server domain to another, or from one directory location to another. Once you understand how to accomplish it, migrating Magento to a new server is a simple operation. This article will walk you through the processes to effectively transfer a Magento website from one server to another.
THE FIRST METHOD
- The files on the test server should be backed up.

- Refresh the cache in your test site’s admin backend by going to System > Cache Management. Then, using a file manager or FTP tools, download and save the whole Magento shop root directory.
- The Magento Database should be exported.
- EXPORT your Magento shop database to “name.sql.zip” format from your server control panel phpmyadmin database area.
- Transfer the files from Magento to the new server.
- In the new server domain folder, upload the root directory (all files) of your test Magento shop backup from step 1.

- Import the database from the old server to the new one.

- Create a new database, database user, and database user password in your new host account’s phpmyadmin. Then, using a text editor, open the database sql file saved in step 2 and replace the database name mentioned in the file with the new database name, then save it. Then, in this new database, import the “name.sql.zip” database backup that you saved in step 2.

- The database details file should be updated.
- The database details file will be edited next. To do so, navigate to the Magento live site folder, locate the “app/etc/local.xml” file, and update the database details that were prepared in step 4.
- Make changes to the base URL database table.
- The next step is to change the domain name of the old server to the new domain name. Modify the core config data table in your new server’s phpmyadmin magento database as shown below.
- Refresh cache and reindex data with web/unsecure/base url > http://www.newdomain.com/ web/secure/base url > http://www.newdomain.com/

- The cache must be cleared as the last step. Go to the admin area of your website (Login with the test site username and password) Cache management > System Disable cache management by selecting all and deselecting all. After that, go to System—>Index Management. Select fields in Status — ‘REINDEX REQUIRED,’ then select ‘Reindex Data’ from the drop-down menu and click Submit, or remove all files in the new site’s “var/session” and “/var/cache” folders.

THE SECOND METHOD
One issue with this strategy is that both Magento installations must be the same version.
- Refresh the cache on your test site’s backend by going to system > cache management. Then export the database in “dbname.sql.zip” format to create a backup of the test site phpmyadmin database (or any suitable format).
- The next step is to back up the folders listed below from the test site to your computer.
- Inside the frontend folder are the contents (app\design\frontend)
- Inside the frontend folder are the contents (skin\frontend)

- Catalogue and other necessary folders (media\catalog)
- In the new server, create a new Magento store.
- Delete all the tables in the new server’s phpmyadmin database.
- On the first step, unzip the backup database (dbname.sql.zip) and import the “dbname.sql” file into the new database.
- Copy the folders listed below to their new Magento server directories.
- To app/design/frontend, copy the contents of the frontend (app) folder.
- To skin/frontend, copy the contents of the frontend (skin) folder.
- On the new Magento, edit the base URL mentioning table (core config data table). web/unsecure/base url > http://www.newsite.com/web/secure/base url> http://www.newsite.com/web/secure/base url> http://www.newsite.com/web/secure/base url>
- Go to the admin area of your website. Cache management > System Disable cache management by selecting all and deselecting all. Also, go to System—>Index Management to index data. Select fields in Status — ‘REINDEX REQUIRED,’ then from the drop down menu, select ‘Reindex Data,’ and click Submit.